

Best Brewing Equipment for Home Beginners: 2026 Guide
Table of Contents
- What to Look For in Home Brewing Equipment
- Homebrewing Equipment Checklist: What You Actually Need
- Extract vs All-Grain Brewing Equipment: Which Setup Fits You?
- Cleaning and Sanitizing Brewing Equipment: The Step Beginners Skip
- Long-Term Cost Analysis: Is Home Brewing Cheaper?
- Space-Saving Home Brewing Equipment for Apartments
- Your Equipment Upgrade Path: What to Add Next
- Frequently Asked Questions
Last Updated: September 12, 2026
What to Look For in Home Brewing Equipment
The best brewing equipment for home beginners is the setup that matches your batch size, available space, and budget, not the most expensive kit on the shelf. This guide breaks down what you actually need to start brewing beer at home, what you can skip, and where your money goes furthest.
Most beginners overspend on gear they never use and underspend on the two things that decide whether a batch turns out drinkable: temperature control and sanitation. A common mistake is buying a full all-grain rig before brewing a single extract batch. Start smaller than you think you need to.
Below, we'll show you exactly what to buy first, what to add later, and how to avoid the $200 of equipment that sits in a closet after batch two.
Batch Size, Space, and Budget
Batch size drives every other decision. A 1-gallon batch needs a stockpot you may already own; a 5-gallon batch needs a brewing kettle, a fermenter, and somewhere cool to put it.
- 1-gallon batches: stovetop-friendly, roughly 10 to 12 bottles, ideal for apartments
- 5-gallon batches: the standard beginner size, about 48 bottles, needs a dedicated burner or a large stovetop
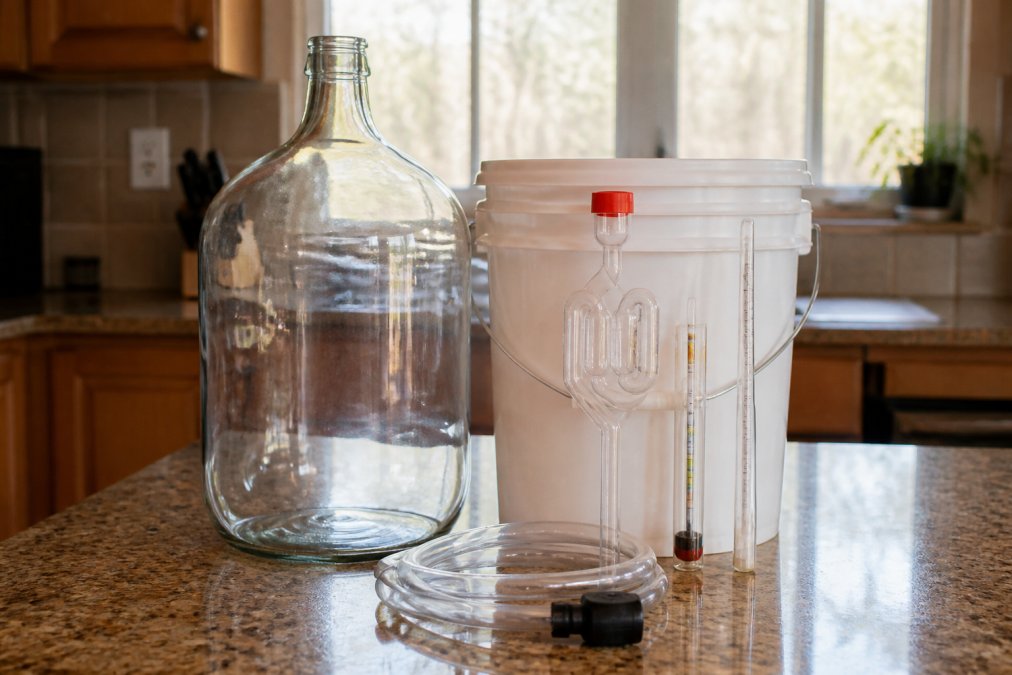
- Space: a 5-gallon glass carboy plus a bottling bucket and kettle takes up roughly a closet shelf plus floor space
Budget accordingly: the equipment itself is a one-time cost, and the ingredients are the recurring one. Many beginners find that a modest starter kit plus a good thermometer beats a big kit with cheap components.
Homebrewing Equipment Checklist: What You Actually Need
A complete beginner homebrewing equipment checklist covers four jobs: heating, fermenting, transferring, and measuring. If a piece of gear does not serve one of those jobs, you probably do not need it yet.
Core equipment:
- Brewing kettle or large stockpot (at least 3 gallons for a 5-gallon extract batch)
- Fermenter: glass carboy or food-grade plastic bucket
- Airlock and stopper
- Sanitizer
- Auto-siphon and racking cane
- Bottling bucket with spigot
- Bottle capper and crown caps
- Hydrometer and hydrometer jar
- Thermometer
- Bottles, or a kegging system if you skip bottling
Nice to have later: wort chiller, yeast starter flask, brewing software, hop spider, mash tun.
Extract vs All-Grain Brewing Equipment: Which Setup Fits You?
Extract brewing equipment is the right starting point for nearly every home beginner. You steep specialty grains in a mesh bag at roughly 150-170°F for 20-30 minutes, remove the bag, stir in malt extract, and boil (homebrewersassociation.org). All-grain brewing replaces the extract with a mash tun and a longer brew day, and it adds equipment most beginners do not need in month one.
The mechanical difference matters more than the marketing. In extract brewing, a maltster has already converted starches to sugars and dried the result into syrup or powder. You are essentially rehydrating someone else's work. In all-grain brewing, you hold crushed malt at a target temperature (usually 148-156°F) for about an hour so enzymes can convert starch to fermentable sugar, then rinse the grains with hot water in a process called sparging (homebrewersassociation.org). That conversion step is the entire reason all-grain exists: it gives you control over fermentability, body, and color in ways extract cannot.
| Setup | Core Equipment | Brew Day | Best For |
|---|---|---|---|
| Extract | 3-5 gallon kettle, fermenter, siphon, bottling gear | 2-3 hours | First-time brewers, small kitchens, anyone learning sanitation and fermentation |
| Partial mash | Adds a 2-5 gallon mash tun or a large mesh bag | 3-4 hours | Brewers who want some grain control without a full all-grain rig |
| All-grain | Adds a 10-gallon mash tun, larger boil kettle (8+ gallons), wort chiller, propane burner or 240V induction | 4-6 hours | Brewers who want full recipe control and repeatability |
The equipment cost gap is real but narrower than most beginners assume. A basic all-grain cooler mash tun conversion runs about the same as a mid-range extract starter kit, but the hidden cost is the boil kettle. A 5-gallon extract batch starts with roughly 2.5-3 gallons of wort that you top off with water in the fermenter. A 5-gallon all-grain batch starts with 6.5-7 gallons of wort because you boil off about a gallon per hour and leave trub behind. That means an 8-10 gallon kettle, a burner strong enough to boil that volume, and a wort chiller sized to cool it. Those three items alone can double the entry cost.
Extract brewing lets you learn fermentation, sanitation, and packaging without also learning mash chemistry. Move to all-grain once you can consistently hit your gravity reading, your beer tastes clean, and you find yourself wanting to adjust a recipe rather than just follow one. If you are still troubleshooting off-flavors, all-grain will multiply your variables, not solve them.
Cleaning and Sanitizing Brewing Equipment: The Step Beginners Skip
Cleaning and sanitizing brewing equipment is the single most common failure point for new brewers. Cleaning removes residue; sanitizing reduces microbes on already-clean surfaces. Skipping either one is the fastest route to a batch that smells like wet cardboard or vinegar.
The order matters: rinse immediately after use, clean with a dedicated brewery cleaner, then sanitize on brew day, not weeks before. Anything that touches cooled wort must be sanitized. Anything that only touches boiling wort does not.
A common mistake is using dish soap on fermenters. Residue kills head retention and can leave off-flavors. Dedicated cleaners rinse clean and do the job faster.
Long-Term Cost Analysis: Is Home Brewing Cheaper?
Home brewing can be cheaper than buying craft beer, but only after you brew enough batches to absorb the equipment cost. The gear is a fixed cost; ingredients are the variable one, and ingredient cost per bottle drops sharply with batch size.
A rough way to think about it: add up your total equipment spend, divide by the number of batches you realistically brew in a year, then add the ingredient cost per batch. Beginners who brew four or five batches a year usually break even within the first year or two. Beginners who brew once and quit never do.
The bigger long-term savings come from buying ingredients in bulk and reusing bottles instead of buying new ones each time. Kegging systems cost more upfront but cut bottling time and eliminate bottle waste.
Space-Saving Home Brewing Equipment for Apartments
Apartment brewers can brew full 5-gallon batches, but the equipment has to earn its footprint. The biggest space wins come from choosing a plastic bucket fermenter over glass, stacking gear vertically, and picking a kettle that doubles as a stockpot.
If floor space is truly tight, 1-gallon batches on the stovetop are a legitimate way to learn the process without dedicating a corner of your kitchen to it.
Your Equipment Upgrade Path: What to Add Next
The upgrade path is simple: add equipment only when a specific problem shows up. Buying gear you have not needed yet is how beginners end up with unused equipment and a stalled hobby. The roadmap below is ordered by the problem each upgrade solves, not by how impressive the gear looks on a shelf.
American Homebrewers Association beginner resources
Frequently Asked Questions
What equipment do I need to start home brewing?
At minimum you need a brewing kettle or stockpot, a fermenter with an airlock, a sanitizer, a siphon or racking cane, a hydrometer, and bottles with crown caps. A thermometer and bottling bucket make the process easier. Beginners can start with a simple extract kit that bundles most of these items, then add a wort chiller or kegging system later as skills grow.
Is homebrewing actually cheaper than buying craft beer?
It can be, but only after you factor in equipment. A basic homebrewing equipment checklist might cost $100 to $200 upfront, then ingredients run roughly $30 to $50 per five-gallon batch. That works out to about $0.60 to $1.00 per bottle compared with $2 to $3 for craft beer at retail. The savings grow the more batches you brew.
What are the differences between extract and all-grain brewing equipment?
Extract brewing uses malt extract syrup or powder, so you only need a kettle, fermenter, and basic tools. All-grain brewing requires a mash tun, a larger boil kettle, and often a wort chiller and brewing software to hit target gravity. Extract setups cost less and take up less space, while all-grain gives you more control over flavor and is the natural upgrade once you're comfortable with the process.
How much space do I need for a home brewing setup?
A five-gallon extract setup fits in a closet or corner of a kitchen, roughly the footprint of a large stockpot plus a fermenter. All-grain setups need more room for a mash tun and boil kettle, often a garage or patio. Apartment brewers can use one-gallon batches, a countertop fermenter, and a small immersion chiller to keep the footprint under two square feet.
How do I clean and sanitize brewing equipment properly?
Rinse all equipment with warm water right after use, then scrub with a soft brush and unscented cleaner to remove trub and residue. Before each batch, apply a no-rinse sanitizer to every surface that touches wort or beer, including the fermenter, airlock, siphon, and bottling bucket. Skip scented dish soap because it leaves oils that kill head retention and can spoil flavor.
Home brewing rewards patience and clean technique more than expensive gear. Start with a modest extract setup, master sanitation and temperature control, and upgrade only when a real problem justifies it. When you're ready to pair your homebrew hobby with a better daily cup, LGBrewTeaQ roasts coffee to order and delivers it fresh, with a simple ordering process and fast, reliable delivery. Shop Coffee and start your next batch with beans worth brewing for.